API Connector Documentation
Import Zoho Data to Google Sheets (Any Application)
In this guide, we’ll walk through how to import data from any Zoho application directly into Google Sheets, using the API Connector add-on for Sheets.
API Connector currently only has a built-in integration for Zoho CRM, so Zoho's other services require configuring your own custom OAuth connection. This is a general guide showing how to set up a custom OAuth connection in API Connector for any Zoho service, e.g. Zoho Books, Zoho Analytics, Zoho SalesIQ, and so on.
Contents
- Before You Begin
- Part 1: Get Your Zoho OAuth Credentials
- Part 2: Find Your Zoho API Scopes
- Part 3: Connect the Zoho API to API Connector
- Part 4: Get Zoho Data in Sheets
- Part 5: API Documentation
Before You Begin
Click here to install the API Connector add-on from the Google Marketplace.
Part 1: Get your Zoho OAuth Credentials
- Log in to Zoho and navigate to the Zoho API Console at https://api-console.zoho.com/
- Click Add Client

- You'll be prompted to choose a client type. Choose Server-based applications and click CREATE NOW

- You'll now need to fill out your API client details. You can can name your client anything, but make sure to use the redirect URL provided in this article on configuring custom OAuth. Click CREATE

- You'll now be presented with your Client ID and Client Secret. Copy these, we'll need them shortly.

Part 2: Find Your Zoho API Scopes
Each Zoho API requires a different set of scopes, or permissions. Available scopes are listed in the documentation for each individual API. A few examples for different services are shown below:
Zoho CRM (docs):
Example scopes: ZohoCRM.modules.leads.ALL,ZohoCRM.modules.deals.ALL,ZohoCRM.settings.ALL
Zoho Analytics (docs)
Example scopes: ZohoAnalytics.data.all,ZohoAnalytics.modeling.create
Zoho SalesIQ (docs)
Example scopes: SalesIQ.chatdetails.READ,SalesIQ.visitordetails.READ
Part 3: Connect Zoho to API Connector
Configure your custom OAuth connection as follows, filling in the application's required scopes in a comma-separated list where it says your_scopes, e.g. https://accounts.zoho.com/oauth/v2/auth?scope=SalesIQ.chatdetails.READ,SalesIQ.visitordetails.READ&access_type=offline
https://accounts.zoho.eu/oauth/v2/token.- Open up Google Sheets and click Extensions > API Connector > Manage Connections
- Scroll to the bottom of the sidebar and click Add Custom OAuth
- Fill in the Custom OAuth modal as follows:
- OAuth Grant Type:
Authorization Code - Name:
Custom Zoho application_name - Authorization Base URL:
https://accounts.zoho.com/oauth/v2/auth?scope=your_scopes&access_type=offline - Token URL:
https://accounts.zoho.com/oauth/v2/token - Client ID: provided by Zoho
- Client Secret: provided by Zoho
- OAuth Grant Type:
- Click Save

- Click Manage Connections to return to the list of connections
- Scroll down until you find your new custom connection. Click Connect

- You'll be prompted to give access to the new app you created above. Click Authorize

- You'll be returned to your sheet and can verify that the new connection is now active.
Part 4: Get Zoho Data in Sheets
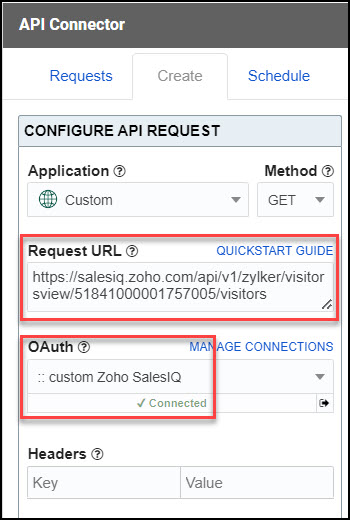
To create a request, include your full request URL in the request URL field, and select your custom Zoho connection from the dropdown OAuth menu.
You can see the full list of available endpoint and parameters in the API documentation. For example, to get SalesIQ visitor data, click Extensions > API Connector > Create Request and run a request like this:
- Application:
Custom - Method:
GET - Request URL:
https://salesiq.zoho.com/api/v1/zylker/visitorsview/51841000001757005/visitors - OAuth:
Custom Zoho

Part 5: API Documentation
Official API documentation: https://www.zoho.com/developer/rest-api.html
To fully disconnect the app, navigate to https://accounts.zoho.com/home#sessions/userconnectedapps and click Revoke Access.


