API Connector Documentation
Import Zendesk Data to Google Sheets
In this guide, we’ll walk through how to pull data from the Zendesk API directly into Google Sheets, using the API Connector add-on.
We'll first get an API token from Zendesk, and then set up a request to pull in Zendesk data to your spreadsheet.
Contents
- Before You Begin
- Part 1: Get your Zendesk API Token
- Part 2: Pull Data from Zendesk to Sheets
- Part 3: Create a Custom API Request
- Part 4: Handle Pagination
- Part 5: API Documentation
Before You Begin
Click here to install the API Connector add-on from the Google Marketplace.
Part 1: Get Your Zendesk API Token
- While logged into your Zendesk account, click Channels > API from the main dashboard.

- Tick the checkbox to agree to the terms of service, and click Get Started.

- Enable the setting for Token Access, and then click the plus (+) sign to add a new token.

- You will now see a token. Copy this and keep it secure as it won't be displayed again.

- One last step: Because the Zendesk API requires Basic Authentication, we need to encode our authentication info to base 64. You can do this by entering your your credentials in the format
your_email_address/token:your_api_tokeninto this form, i.e. your email address followed by a slash, the word token, a colon, and then your API token. Your encoded credentials will appear underneath (and will be referred to as "your encoded credentials" in subsequent sections).
The encoding script runs in your browser, and none of your credentials are seen or stored by this site.
Part 2: Pull Data from Zendesk to Sheets
The easiest way to get started with the Zendesk API is through API Connector’s built-in integration.
- Select Zendesk from the drop-down list of applications

- Under Authorization, enter your encoded credentials from above, with the word
Basicin front.
- Choose an endpoint, for example
/groups.json
- Enter any required parameters. In this case, that's just the subdomain of your site.
- Choose a destination sheet, name your request, and hit Run to see the response data in your sheet.

Part 3: Create a Custom API Request
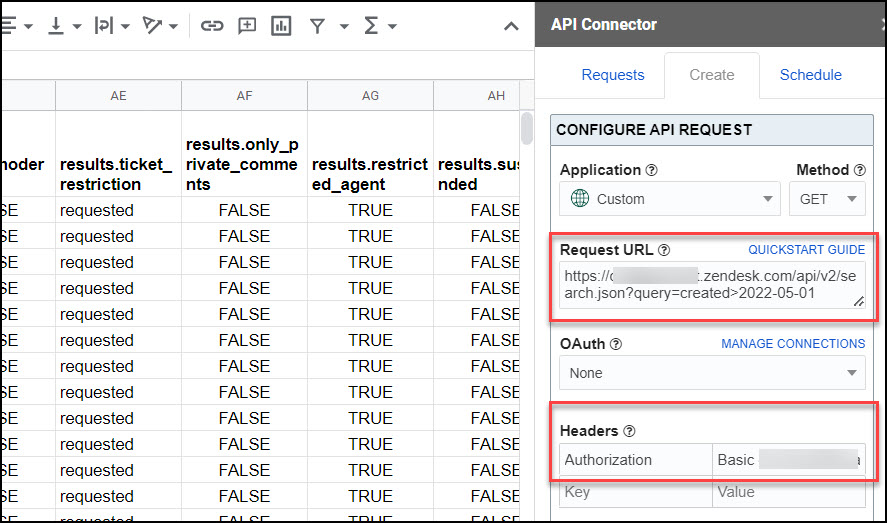
Alternatively, you can run your own custom requests instead of using API Connector’s pre-built integration, using any of the endpoints and parameters shown in the API documentation. Substitute in your own encoded credentials where it says your_encoded_credentials. Here's an example request setup:
- Application:
Custom - Method:
GET - Request URL:
https:/your_site.zendesk.com/api/v2/search.json?query=created>2022-05-01 - Headers:
Authorization: Basic your_encoded_credentials

Part 4: Handle Pagination
Zendesk limits the number of records returned in each request. By default, only 100 records will be returned unless you use the 'page' parameter as described in their documentation.
With API Connector, you can cycle through their "next_page" links automatically with pagination handling, like this:
- Pagination:
next page URL - Next page path:
next_page - Run until: choose when to stop fetching data

Part 5: API Documentation
Official API documentation: https://developer.zendesk.com/rest_api/docs/support/introduction


Hi Ana,
would you provide detailed instructions on cursor pagination ?
Cursor-based pagination does not have any page depth or resources limit as opposed to other pagination approches which are limited to the first 100 pages and 10,000 resources.
That would be very helpfull !
Specifically, what should those be :
Next token parameter
Next token path
Many thanks !