API Connector Documentation
Import Xero Data to Google Sheets
In this guide, we’ll walk through how to pull Xero accounting data data directly into Google Sheets, using the API Connector add-on for Sheets.
Contents
- What Does This Integration Do?
- Before You Begin
- Part 1: Connect to the Xero API
- Part 2: Pull Xero API Data into Sheets
- Part 3: Create a Custom Xero Request
- Part 4: Handle Pagination
- Part 5: API Documentation
- FAQ
What Does This Integration Do?
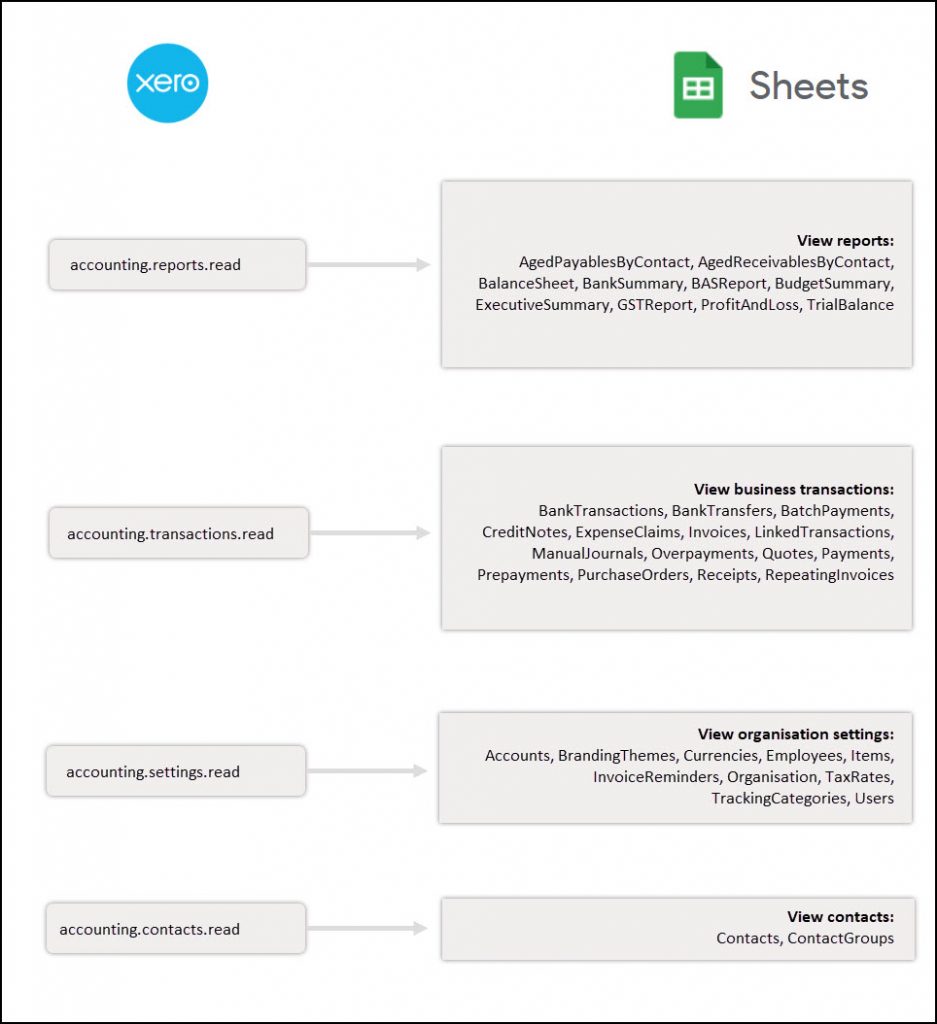
This integration pulls accounting data from Xero's Accounting API into Google Sheets. It enables the following scopes: openid, email, profile, offline_access, accounting.reports.read, accounting.transactions.read, accounting.settings.read, accounting.contacts.read, and accounting.journals.read.

Before You Begin
Click here to install the API Connector add-on from the Google Marketplace.
Part 1: Connect to the Xero API
The easiest way to get started with the Xero API is through API Connector’s built-in integration.
- In Sheets, open API Connector and create a new request (Extensions > API Connector > Open > Create request)
- Select Xero from the drop-down list of applications

- Under Authorization, click Connect to Xero

- You'll be asked to select an organization and authorize the connection. Click Allow access. If you want to access multiple organizations, you can click Connect again to select additional organizations.

- You'll then be returned to your Google Sheet, and can verify that your Xero connection is active.
Part 2: Pull Data from Xero to Sheets
Now that we’re connected, let’s pull some data into Sheets.
- Under Endpoint, select the resource that you'll be querying. For this example, we'll select
/Invoices.
- Under Headers, select the organization for which you'd like to fetch data from the dropdown list.

- Under Request parameters, optionally set the
orderparameter to set the order of results, and thewhereparameter to filter them. - Choose a destination sheet, name your request, and hit Run to see the report in your sheet.

Note: Besides the standard API endpoints, Xero provides special Reports endpoints to retrieve the most commonly viewed reports (Balance Sheets, Budget Summary, Profit & Loss, etc). You can view these reports in the Endpoint dropdown by scrolling down or searching for "Reports".
Part 3: Create a Custom Xero Request
Alternatively, you can run your own custom requests instead of using API Connector’s pre-built integration, using any of the endpoints and parameters shown in the API documentation.
Here's a sample request setup to demonstrate how it works.
- Open up Google Sheets and click Extensions > API Connector > Open > Create request.
- In the request form enter the following:
- Application:
Custom - Method:
GET - Request URL:
https://api.xero.com/api.xro/2.0/Invoices - OAuth:
Xero
- Application:
- When you select Xero from the OAuth menu, you'll see a blue Connect button if you haven't already authorized the connection. Click through to enable the connection.
- If you have multiple company accounts in Xero, you can add them by clicking the
+tenantbutton, and then toggle between them using the dropdown account selector. - Create a new tab and click Set current to use that tab as your data destination.
- Name your request and click Run. A moment later you’ll see invoice data populate your sheet.

Notes:
- Date parameters are optional. If you leave them off, the current month will be returned.
- An earlier version of this article recommended adding a JMESPath snippet of
Reports[].Rows[].Rows[]to restructure Reports data into a tabular format for Sheets. As of 2023-05-13, API Connector will automatically restructure the data such that JMESPath is no longer needed. Requests created prior to the cutoff date will be unaffected.
Part 4: Handle Pagination
Xero limits the number of records returned in each request. By default, only 100 records will be returned unless you use the 'page' parameter as described in their documentation.
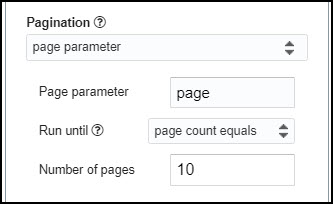
To access more than 100 records, loop through pages automatically with pagination handling, like this:
- Pagination type:
page parameter - Page parameter:
page - Run until: choose when to stop fetching data

Part 5: API Documentation
Official API documentation: https://developer.xero.com/documentation/api/api-overview
Reports documentation: https://developer.xero.com/documentation/api/accounting/reports
FAQ
- How do I disconnect from Xero?
To disconnect from Xero, click the Manage Connections link and click Disconnect next to the Xero connection. You can also navigate to https://apps.xero.com/!XJG5x/ca/connected (or click your company dropdown > App Store > Connected Apps) and disconnect there. - What doesn’t your integration do?
This integration does not push data from Google Sheets to Xero. It is a one-way connection that pulls data from Xero to Sheets. - When and how does data get pulled into Sheets?
Data can be pulled into Sheets by opening your request and manually clicking Run, which will refresh your sheet with the latest data from Xero's API. Alternatively, you can enable scheduling and automatically refresh requests at the cadence you select (up to 1x an hour). - Can I run scheduled updates more than once an hour?
Scheduled triggers can not run more than once an hour. This limit is set by Google. - How much data can I pull into Sheets?
There is no specific limit on the amount of data you can pull from Xero's API into Google Sheets. However, Google Sheets only lets requests run for 6 minutes per execution, so very large requests may time out and fail to complete. If you experience issues, please limit requests where possible (e.g. use append mode to fetch new data instead of fetching the entire data set each time).


Hi there - I've been trying to get a custom OAuth2 connection to work with Workflowmax, which is owned by xero. I see that you have a xero connector but it doesn't seem to apply to workflowmax. Any tips on how I would configure a custom connector?
So far I have a client id, and secret and I think I have the authentication URL right but i'm not sure how to build the token URL or how to use the token in the header of a subsequent request.
Hey Jay, if you're using OAuth2 you shouldn't need to manually add any tokens to your headers. The authorization and token URLs should be provided in the Workflowmax docs (I just checked and it looks like authorization URL =
https://login.xero.com/identity/connect/authorize?scope=workflowmax&offline_accessand token URL =https://identity.xero.com/connect/token). Can you please try that and let me know how it goes?Thanks for your quick response!
The two URLs you've identified are what I have configured so that's good and I think it's working. When I click on the 'connect' button it authenticates against xero and returns to the google sheet as expected.
Given that i'm using the OAuth2 connector you indicated that I don't need to do the token refresh. And of course, you're right! I just re-read how to make calls to the API and I was missing a header for the tenant id. I've added that and it's working as expected now.
Thanks for your help!
I am busy working on this and would like to limit the results of the Xero Items API calls. It's working perfectly except for the sales details unit price.
Can anyone see anything wrong with this
Items[*].{Code:Code,Description:Description,QuantityOnHand:QuantityOnHand,Xero_Price:SalesDetails[*].unitPrice,IsTrackedAsInventory:IsTrackedAsInventory}Thanks
Hey Andrew, the problem is that SalesDetails is an object, not an array. Please try this instead:
Items[*].{Code:Code,Description:Description,QuantityOnHand:QuantityOnHand,Xero_Price:SalesDetails.UnitPrice,IsTrackedAsInventory:IsTrackedAsInventory}Worked Thanks 😀
How do I call a report using the now() date range (eg. to get this year-to-date P&L report)?
Do you mean the P&L report described here? https://developer.xero.com/documentation/api/accounting/reports#profit-and-loss
In that case you'd create a request like
https://api.xero.com/api.xro/2.0/Reports/ProfitAndLoss?fromDate=+++Sheet1!A1+++&toDate=+++Sheet1!A2+++, where you reference the date cells in your sheet as described here.Hi, can I pull budget info from Xero with this API. I tried setting this up and got this error:
"1) Budgets API: Completed with errors
- We received an error from xero.com (401) show response
{"Type":null,"Title":"Unauthorized","Status":401,"Detail":"AuthorizationUnsuccessful","Instance":"d3d909cf-b207-4449-a8c1-304ab17a6bab","Extensions":{}}"
Can you try please clicking Disconnect and then reconnecting? Or please message support if you continue having issues.
Would be helpful to have a fully worked example for Xero. A typical P&L report pull -- the most common use case -- has 12 months of data:
https://api.xero.com/api.xro/2.0/Reports/ProfitAndLoss?fromDate=2022-12-01&toDate=2022-12-31&periods=11&timeframe=MONTHOther integration tools drop this into Google sheets in a friendly format : Ie one column per month one row per category. Can you supply the GMES path or other Output options settings that would produce this. The sample JMES path here and the one in the documentation provide either no values or just a single month.
A JMESPath of
Reports[].Rows[].Rows[]will put the response into a table.Update: The Reports endpoints will now automatically be parsed into a tabular format (no JMESPath needed).
Hi, I'm using the https://api.xero.com/api.xro/2.0/Quotes url but I want to append this to only run quotations from 01/01/23 onwards, can you please advise of how I can do this?
Thanks.
You should be able to use a request URL of
https://api.xero.com/api.xro/2.0/Quotes?DateFrom=2023-01-01&DateTo=2023-04-14, does that get you what you're looking for? I believe you can leave off theDateToparameter if you don't need it, or make these dates dynamic by referencing date cells in your sheet.Additionally I only want to pull the info for the following:
Quotes.QuoteNumber
Quotes.Contact.Name
Quotes.DateString
Quotes.Status
Quotes.SubTotal
Can you advise the best way to do this?
Thanks!
You can open the field editor and filter out all the fields but the ones you're interested in.
This is a great tool. We use tracking categories to track our department (we have 5 departments) is there any way to add this information to the the P&L report?
Good question! I just added two elements to the Xero integration: 1) the
/TrackingCategoriesendpoint so you can fetch tracking category IDs, and 2) thetrackingCategoryIdparameter to the P&L report so you can enter a tracking category ID and modify the report. Can you please check if that gets you what you're looking for?I'm trying to get the latest price paid on items, or at least the average cost of the stock on hand. The /item endpoint doesn't bring the average cost price (that's available as a column in the Xero Inventory Item List report), and obviously not the latest price paid. The /PurchaseOrders option doesn't bring back any details regarding items in the purchase order.
Is there any way to get the most recent costs for all items, or at least the average price?
Sorry, I see now a column Items.TotalCostPool, so this should be enough for now. Ideally, I would like some report that gives me the last paid price. Like export all recent bills, with the items.
Hey IK, I can't say much about specific data points beyond what Xero has written in their docs. They list all their available data points here if you'd like to check if they offer what you're looking for (this is a link to the Items endpoint, but the others can be browsed as well via the menu in the sidebar): https://developer.xero.com/documentation/api/accounting/items