API Connector Documentation
Import Mailchimp Data to Google Sheets
In this guide, we’ll walk through how to pull data from the Mailchimp API directly into Google Sheets, using the API Connector add-on for Google Sheets.
There are 2 ways to connect to the Mailchimp API:
- Preset "Connect" button (OAuth)
- Personal API key. Please check the appendix for detailed instructions to retrieve your key.
Contents
- Before You Begin
- Part 1: Connect to the Mailchimp API
- Part 2: Pull Data from Mailchimp to Sheets
- Part 3: Create a Custom API Request
- Part 4: Handle Pagination
- Part 5: API Documentation
- Appendix: Connect with a Mailchimp API Key
Before You Begin
Click here to install the API Connector add-on from the Google Marketplace.
Part 1: Connect to the Mailchimp API
The easiest way to get started with the Mailchimp API is through API Connector’s built-in integration.
- Select Mailchimp from the drop-down list of applications

- Under Authorization, click Connect to Mailchimp

- You will be asked to authorize the connection. Click Allow.

- You’ll then be returned to your Google Sheet, and can verify that your connection is active.
Part 2: Pull Data from Mailchimp to Sheets
Now that we’re connected, let’s pull some data into Sheets.
- Under Endpoint, choose an endpoint. Let's start with
/lists.
- Enter your data center. To get your data center, check the URL when you're logged in to your Mailchimp account. In this example, the data center would be
us20.
- There are no other required parameters for this endpoint, so just select a destination sheet, name your request, and click Run. Note the
lists.idvalue as you can plug that into the/lists/{list_id}/membersendpoint to fetch the members of that list.
Part 3: Create a Custom API Request
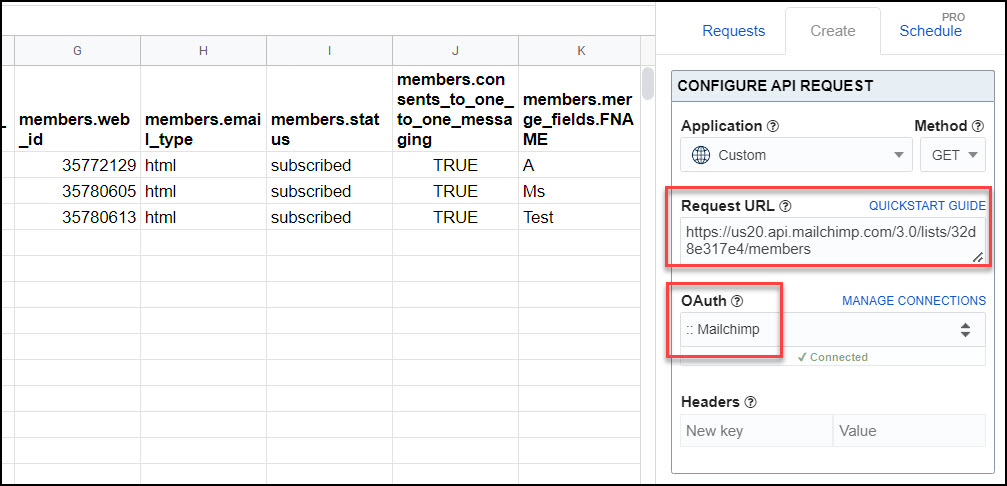
Alternatively, you can create a custom request instead of using API Connector’s built-in integration, using any of the endpoints and parameters shown in the API documentation. Here's an example request setup, just substitute in your own datacenter and list IDs.
- Application:
Custom - Method:
GET - Request URL:
https://us20.api.mailchimp.com/3.0/lists/32d8e317e4/members - OAuth:
Mailchimp(or connect with a key)

Part 4: Handle Pagination
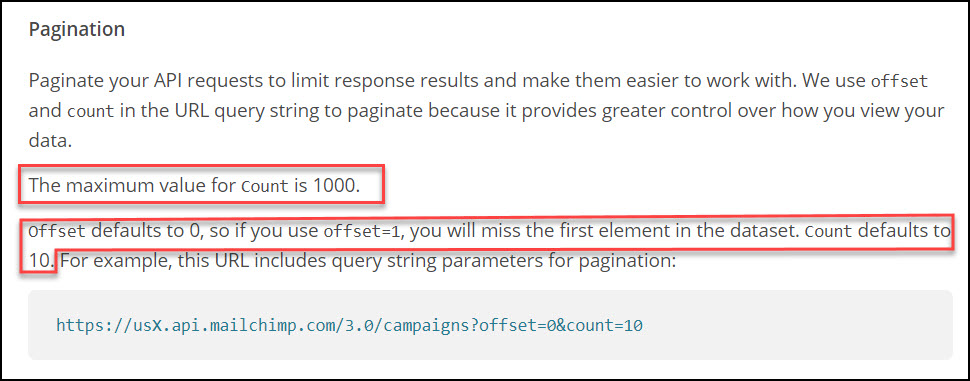
Note Mailchimp’s limits on the number of records returned on a response. By default, only 10 records will be returned unless you use the ‘count’ and ‘offset’ parameters as described in their documentation.

With API Connector, you can either set these up as separate requests or loop through them automatically with pagination handling:
- Offset parameter: offset
- Limit parameter: count
- Limit value: 1000
- Run until: choose when to stop fetching data

Part 5: API Documentation
Official API documentation: https://mailchimp.com/developer/marketing/api/
To view/remove the connection on Mailchimp's side, follow the instructions here: https://mailchimp.com/help/remove-an-application-from-your-account/
Appendix: Connect with an API Key
- As an alternative to using the preset OAuth integration, you can connect with an API key. Log into your Mailchimp account and navigate to the API Keys section (or just click this link: https://us1.admin.mailchimp.com/account/api/)
- Click the Create A Key button

- You'll now see your API key listed in a section titled "Your API keys"

- To use, under Headers, enter
Authorizationas your Key, andapikey YOUR_API_KEYas your Value, like this. Keep OAuth set to None as you're authorizing with an API key instead.


why me just get 10 data from mailchimp?
The Mailchimp API documentation says:
Paginate your API requests to limit response results and make them easier to work with. We use offset and count in the URL query string to paginate because it provides greater control over how you view your data.
Offset defaults to 0, so if you use offset=1, you will miss the first element in the dataset. Count defaults to 10. For example, this URL includes query string parameters for pagination: https://usX.api.mailchimp.com/3.0/campaigns?offset=0&count=10
What this means is that by default, Mailchimp only provides 10 records at a time. To get more, change the parameters at the end of your URL, e.g.:
https://us20.api.mailchimp.com/3.0/campaigns?count=50
Then to get the next 50 results, you'd enter:
https://us20.api.mailchimp.com/3.0/campaigns?offset=50&count=50
Super product, kudos! Is there a possibility to work with arrays such as are provided through e.g. this (in emails >> activity):
https://usXX.api.mailchimp.com/3.0/reports/[campaign_id]/email-activity?count=500&fields=emails.campaign_id,emails.list_id,emails.email_address,emails.activity.timestamp,emails.activity.action,emails.activity.url,emails.activity.typeThank you so much! I am working on an update now that will provide more options for displaying arrays and nested data. You can see more info here: https://mixedanalytics.com/knowledge-base/report-styles/
Will that work for you?
Oh yes! Looking forward to it!
This is now live : )
This is great! Thank you!
This is great!
Is there a more efficient way to retrieve data count with 60,000 + rows rather than running the api request 65 times?
Nope, Mailchimp only returns 1000 rows in a single call so you need to run multiple calls to retrieve all your records. API Connector automates this with pagination handling.
A pity that exporting poll results currently isn't possible...
I didn't know that, but just checked and confirmed that poll data doesn't seem to be available in the API. That's unfortunate. Thanks for letting me know.
Facing the following error:
Request failed: Attribute provided with invalid value: Header:HeaderKey
although I have followed this (https://mixedanalytics.com/knowledge-base/access-mailchimp-data-in-google-sheets/) article step by step and have double checked but still the error persists: Need help ASAP
This error means there's an incorrect value into the Header field. Can you please make sure you haven't included any typos or extra spaces at the beginning or end? If you'd like me to take a look, please feel free to message me a link to your sheet.
Hi,
How to get survey results?
Regards,
Michel.
Are survey results the same as poll results? If so, someone in the comments noted that this isn't available via the API (you can see some more info on this here).
Thanks Ana.
Thanks for your quick reply 🙂
I already saw this info, but as it dated from 2018, I had hoped that Mailchimp had evolved in the meantime. So, it is not the case 🙁
From my point of view, a poll is inside emails and his results are values 0-10. The survey is done via a separate form, with others questions than having a answer 0-10: it could be radio-buttons, check-boxes…
Kind regards,
Michel.
Great product - haven't looked yet - but hoping the upgrade extended usage time is not too much.
FYI The MailChimp playground link is dead. They have moved it and their logic: https://mailchimp.com/developer/release-notes/sunsetting-the-mailchimp-api-playground/
Thank you for letting me know! That's a shame, it was a useful tool. I've just updated the article to remove the link.
Can you advice query url for getting a total number of subscribers currently in a specific list?
When you run a query like
https://us20.api.mailchimp.com/3.0/lists/32d8e317e4/members, it returns a field called "total_items" that contains the number of subscribers in the list.Hey its returning contacts but not subscribers
I'm not totally clear on the difference, but I'd just check some of their lists endpoints, one of them should have what you're looking for. For example their description for the
/lists/{list_id}endpoint says "Get information about a specific list in your Mailchimp account. Results include list members who have signed up but haven't confirmed their subscription yet and unsubscribed or cleaned." Maybe that's what you're looking for?Is it possible to also get list growth report? (/lists/{list_id}/growth-history)
Sure, it's not part of our integration but you can follow the custom request instructions to request data from any endpoint available via the API.