API Connector Documentation
Import Dr Chrono Data to Google Sheets
In this guide, we’ll walk through how to import Dr Chrono data directly into Google Sheets, using the API Connector add-on for Sheets. We'll set up a custom OAuth connection and connect to their API.
Contents
- Before You Begin
- Part 1: Get Your Dr Chrono OAuth Credentials
- Part 2: Connect the Dr Chrono API to API Connector
- Part 3: Get Dr Chrono Data in Sheets
- Part 4: Handle Pagination
- Part 5: API Documentation
Before You Begin
Click here to install the API Connector add-on from the Google Marketplace.
Part 1: Get your Dr Chrono OAuth Credentials
- Log in to Dr Chrono and click API in the dropdown menu (or navigate to https://drchrono.com/api-management/ directly)

- You can name your app anything, but make sure to use the redirect URL provided in this article on configuring custom OAuth. Click Save Changes

- Copy the Client ID and Client Secret, we'll need them shortly.

Part 2: Connect Dr Chrono to API Connector
- Open up Google Sheets and click Extensions > API Connector > Manage Connections
- Scroll to the bottom of the sidebar and click Add Custom OAuth
- Fill in the Custom OAuth modal as follows:
- OAuth Grant Type:
Authorization Code - Name:
Custom Dr Chrono - Authorization Base URL:
https://drchrono.com/o/authorize/(This will allow all available scopes; if you would like to limit them, attach them to the end of the authorization base URL, e.g.https://drchrono.com/o/authorize/?scope=patients:summary:read calendar:read clinical:read) - Token URL:
https://drchrono.com/o/token/ - Client ID: provided by Dr Chrono
- Client Secret: provided by Dr Chrono
- OAuth Grant Type:
- Click Save

- Click Manage Connections to return to the list of connections
- Scroll down until you find your new custom connection. Click Connect

- You'll be prompted to give access to the new app you created above. Click Authorize

- You'll be returned to your sheet and can verify that the new connection is now active.
Part 3: Get Dr Chrono Data in Sheets
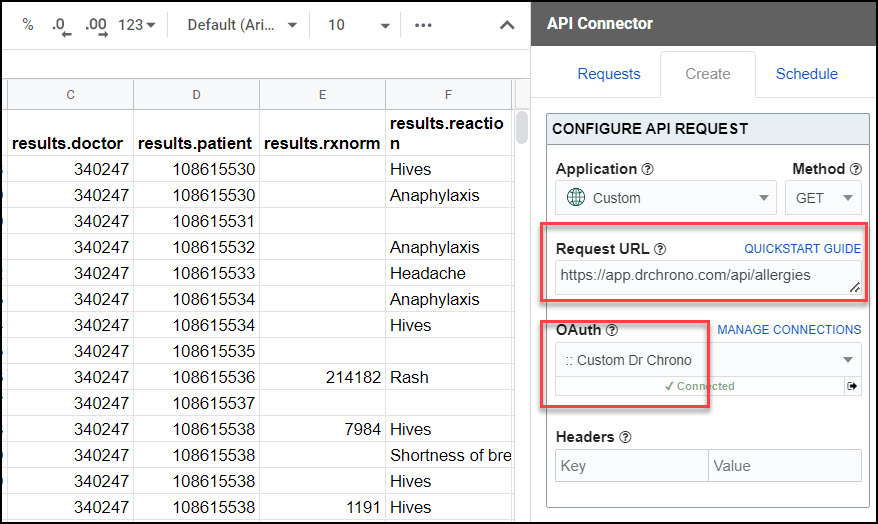
To create a request, include your full request URL in the request URL field, and select your custom Dr Chrono connection from the dropdown OAuth menu.
You can see the full list of available endpoint and parameters in the API documentation. For example, to get a list of patient allergies, run a request like this:
- Application:
Custom - Method:
GET - Request URL:
https://app.drchrono.com/api/allergies - OAuth:
Custom Dr Chrono

Part 4: Handle Pagination
By default, Dr Chrono will limit the number of records returned at one time (usually to 250 records per page). To fetch more records, use pagination handling.
- Pagination type:
next page URL - Next page path:
next - Run until: choose when to stop fetching data

Part 5: API Documentation
Official API documentation: https://drchrono.com/api-docs/#section/Introduction


